


Game Information
Adelaide Oval
| fourth Quarter | |||
|---|---|---|---|
| Time | Team | Play | Score |
| 28:34 |  | R. Sloane Goal | 174 - 52 |
| 25:08 | | J. Rachele Behind | 168 - 52 |
| 22:19 |  | J. Darling Goal | 167 - 52 |
| 18:10 | | T. Walker Goal | 167 - 46 |
| 14:55 | | Bailey J. Williams Goal | 161 - 46 |
| 13:21 | | L. Sholl Goal | 161 - 40 |
| 12:03 | | R. Maric Behind | 155 - 40 |
| 9:10 | | T. Walker Behind | 155 - 39 |
| 7:51 | | T. Walker Goal | 154 - 39 |
| 6:10 | | L. Murphy Goal | 148 - 39 |
| 1:59 | | R. Sloane Goal | 142 - 39 |
| third Quarter | |||
| Time | Team | Play | Score |
| 32:34 | | D. Fogarty Behind | 136 - 39 |
| 24:57 | | D. Fogarty Goal | 135 - 39 |
| 22:03 | | T. Walker Goal | 129 - 39 |
| 20:33 | | J. Darling Behind | 123 - 39 |
| 19:15 | | A. Gaff Goal | 123 - 38 |
| 15:30 | | J. Rachele Goal | 123 - 32 |
| 14:31 | | I. Rankine Behind | 117 - 32 |
| 11:38 | | R. Thilthorpe Goal | 116 - 32 |
| 10:13 | | R. Maric Goal | 110 - 32 |
| 8:41 | | I. Rankine Goal | 110 - 26 |
| 6:41 | | L. Pedlar Goal | 104 - 26 |
| 4:11 | | L. Sholl Goal | 98 - 26 |
| second Quarter | |||
| Time | Team | Play | Score |
| 32:04 | | T. Walker Goal | 92 - 26 |
| 30:22 | | T. Kelly Goal | 86 - 26 |
| 24:10 | | O. Allen Goal | 86 - 20 |
| 21:40 | | B. Keays Goal | 86 - 14 |
| 20:13 | | L. Murphy Goal | 80 - 14 |
| 12:39 | | L. Murphy Behind | 74 - 14 |
| 11:54 | | M. Hinge Behind | 73 - 14 |
| 8:02 | | T. Walker Goal | 72 - 14 |
| 7:42 | | Rushed | 66 - 14 |
| 5:50 | | D. Fogarty Goal | 66 - 13 |
| 4:46 | | L. Pedlar Behind | 60 - 13 |
| 2:44 | | T. Walker Goal | 59 - 13 |
| 1:01 | | T. Walker Goal | 53 - 13 |
| first Quarter | |||
| Time | Team | Play | Score |
| 33:31 | | R. Thilthorpe Goal | 47 - 13 |
| 32:04 | | L. Sholl Behind | 41 - 13 |
| 25:41 | | J. Petruccelle Goal | 40 - 13 |
| 24:23 | | N. Long Behind | 40 - 7 |
| 23:01 | | T. Walker Goal | 40 - 6 |
| 19:55 | | T. Walker Goal | 34 - 6 |
| 18:21 | | J. Soligo Goal | 28 - 6 |
| 16:20 | | I. Rankine Goal | 22 - 6 |
| 15:10 | | J. Soligo Behind | 16 - 6 |
| 12:32 | | I. Rankine Goal | 15 - 6 |
| 12:07 | | I. Rankine Behind | 9 - 6 |
| 9:30 | | T. Walker Behind | 8 - 6 |
| 8:30 | | L. Pedlar Behind | 7 - 6 |
| 3:25 | | R. Maric Goal | 6 - 6 |
| 0:50 | | T. Walker Goal | 6 - 0 |
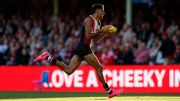
Serong breaks St Kilda hearts with the game-winning goal in the final seconds.
Wanganeen-Milera celebrates his first game back from a calf injury with a goal against the Swans.
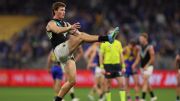
West Coast's Reuben Ginbey comes from the ground with a quad injury after pulling up short in his chase of Port Adelaide's Mitch Georgiades.
West Coast's Reuben Ginbey comes from the ground with a quad injury after pulling up short in his chase of Port Adelaide's Mitch Georgiades.
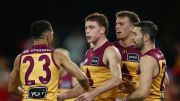
Logan Morris scores an incredible seven goals for the Brisbane Lions against the Gold Coast Suns.
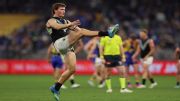
Luke Jackson provides a highlight as Fremantle power to a big lead over North Melbourne in Bunbury
| POS | Team | Pts. | % | Form |
|---|---|---|---|---|
| 1 |
 FRE FRE
|
48 | 147.9 | WWWWW |
| 2 |
 SYD SYD
|
44 | 147.3 | WWLWW |
| 3 |
 HAW HAW
|
34 | 113.2 | LLWWL |
| 4 |
 GEEL GEEL
|
32 | 120.2 | WWWLL |
| 5 |
 WB WB
|
32 | 94.6 | WLWWW |
| 6 |
 SUNS SUNS
|
28 | 112.2 | WWWLL |
| 7 |
 ADEL ADEL
|
28 | 107.4 | WWWLW |
| 8 |
 BL BL
|
28 | 106.2 | WLLLW |
| 9 |
 MELB MELB
|
28 | 101.8 | LWWLL |
| 10 |
 GWS GWS
|
24 | 103.2 | LWLWW |
| 11 |
 COLL COLL
|
22 | 99.9 | DLLWL |
| 12 |
 STK STK
|
20 | 101.9 | LWLLL |
| 13 |
 CARL CARL
|
20 | 88.7 | LWWWW |
| 14 |
 NMFC NMFC
|
20 | 87.7 | LLLWL |
| 15 |
 PORT PORT
|
16 | 101.4 | LLLLW |
| 16 |
 WCE WCE
|
16 | 71.3 | LWLWL |
| 17 |
 RICH RICH
|
8 | 60.4 | WLLWL |
| 18 |
 ESS ESS
|
4 | 71.7 | LLLLL |